How to use M1 TimePilot
A complete, step-by-step guide to setting up and running your workspace — from your first branch to monthly payroll.
1. Getting started
Create your workspace, sign in and get oriented before adding data.
- Go to m1timepilot.com and click Get Started. Pick a plan (7-day free trial, no card), enter your company name, choose a subdomain (e.g. acme.m1timepilot.com), and create your admin login.
- Verify your email, then sign in at app.m1timepilot.com with your work email and password. The Company Code is optional — we find your company by email.
- You land on the Dashboard. The left sidebar is grouped: People, Scheduling, Attendance, Reports and Admin.
2. Recommended setup order
For a smooth start, set things up in this order — each step builds on the one before it:
- Branches — your physical locations.
- Departments & areas — how you group staff and zones.
- Devices — register each biometric machine and point it to the cloud.
- Employees — add people (or let device punches auto-create them), then set their branch, department and salary.
- Timetables → Shifts → Schedules — define working hours and assign them.
- Attendance rules — grace, breaks, overtime and payroll switches.
- Run attendance & payroll — review, approve and export.
3. Branches
A branch is a physical location. Devices, employees and reports are organised by branch.
- Open People → Branches.
- Click Add Branch, enter a code (short, e.g. AUH), a name (e.g. Abu Dhabi Office) and optional address.
- Set the branch weekend days so weekends aren't counted as absences.
- Save. Repeat for each location. You can edit or remove a branch any time.
4. Departments & areas
Departments
- Open People → Departments and click Add Department.
- Give it a code and name (e.g. DRV — Drivers). Save.
- You'll assign employees to a department on their profile — this drives department-wise reports and payroll grouping.
Areas
- Open People → Areas to group locations/zones within a branch (e.g. Warehouse, Reception).
- Areas are optional and help organise devices and staff on large sites.
5. Biometric devices (ZKTeco)
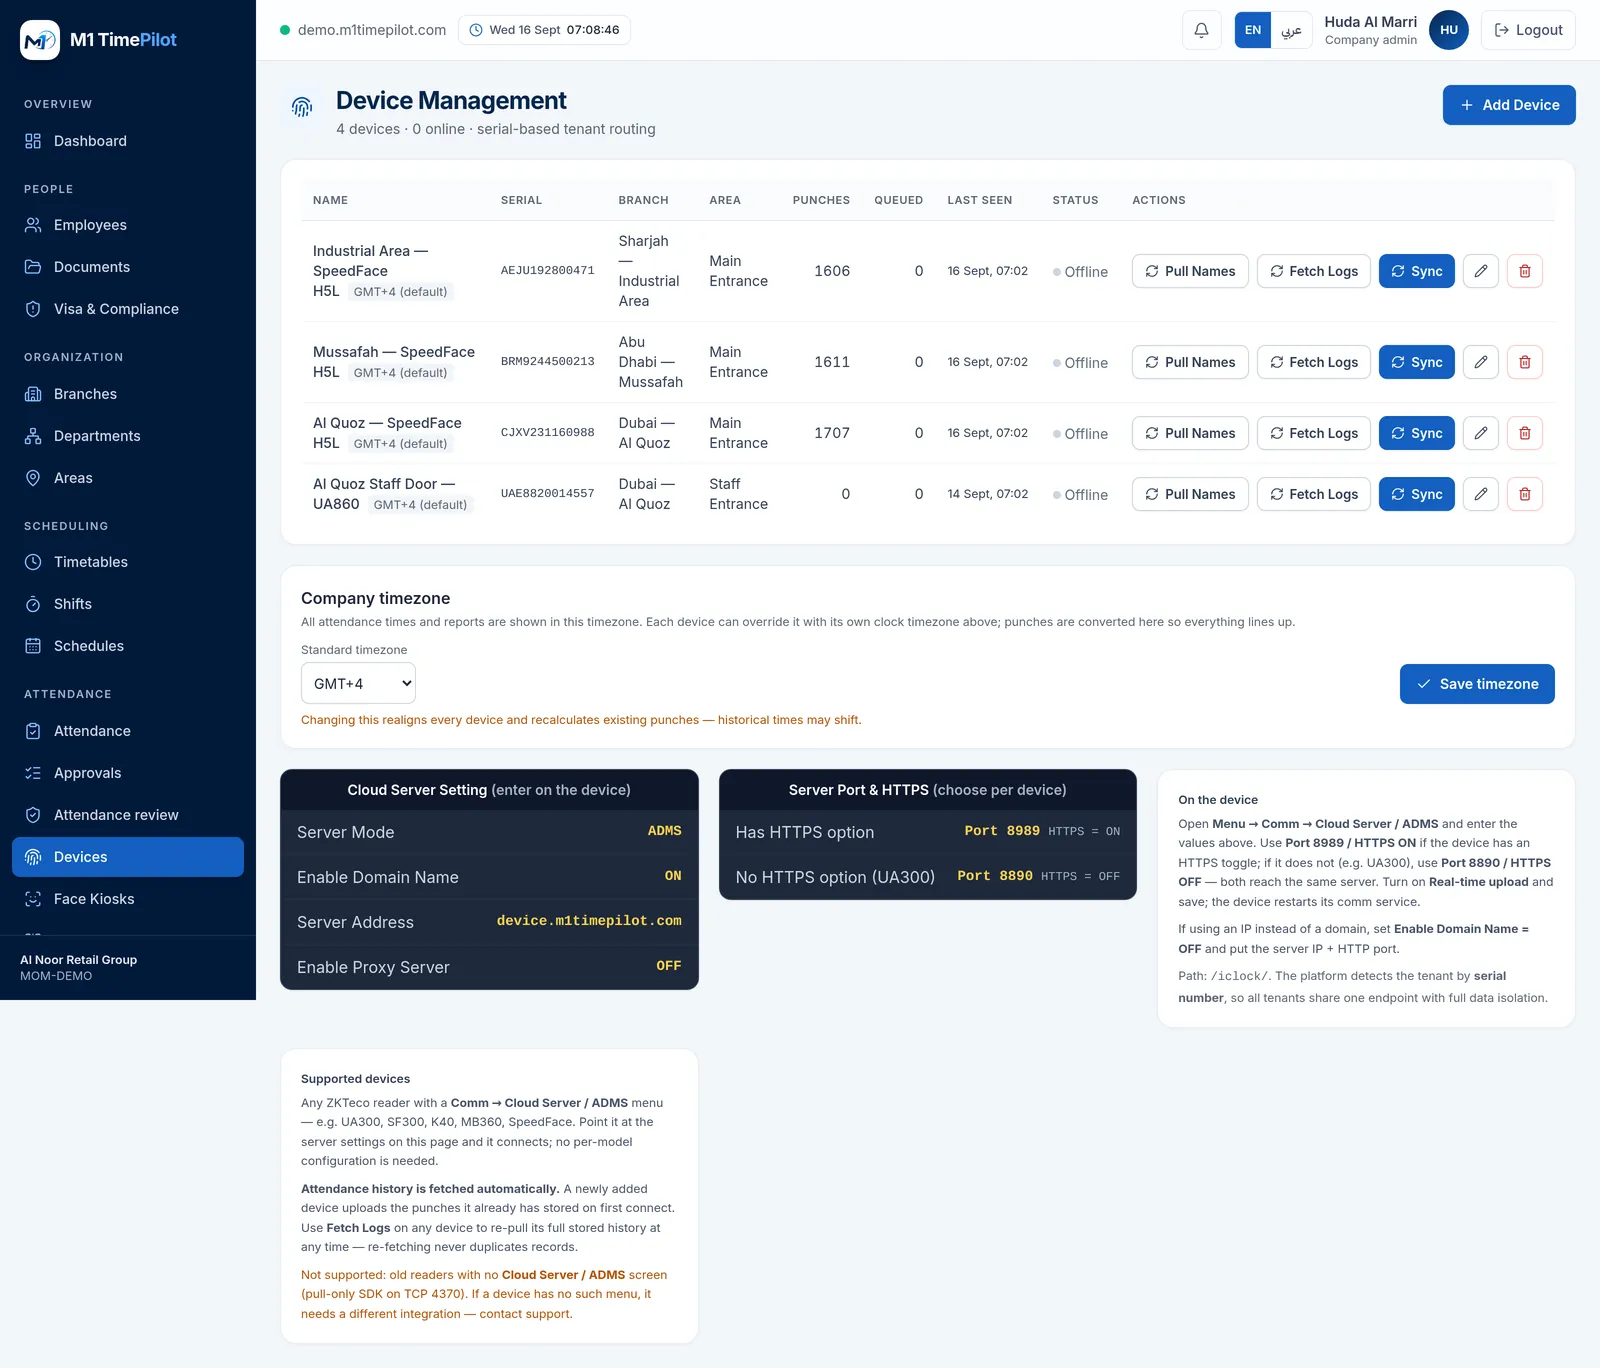
M1 TimePilot works with ZKTeco devices over ADMS/Cloud Push — no on-site server needed. Register the device in the app first, then point the machine to the cloud.
Register the device
- Open Attendance → Devices and click Add Device.
- Enter the device serial number (printed on the device / in its menu), a name, and the branch it belongs to. Save.
Point the device to the cloud
- On the ZKTeco unit go to Menu → Comm → Cloud Server / ADMS.
- Set Server Mode: ADMS, Domain Name: ON, Address: device.m1timepilot.com, Port: 8989 (HTTPS on) or 8890 (HTTPS off), HTTPS: ON, Real-time: ON.
- Save and let the device sync. Its status turns online in the Devices page and punches start flowing in.
5b. Attendance methods (kiosk · GPS · QR · mobile · web)
Beyond biometric devices, M1 TimePilot captures attendance any way your team works. Which methods a client can use is set by their plan edition, and per-client overrides are available to the super admin.
Face-recognition kiosk
- Enrol an employee's face from their profile page (the employee consents once, UAE PDPL).
- Create a kiosk under Attendance → Kiosks, then open its pairing link on any tablet at the entrance.
- Employees check in by looking at the camera; blink & head-turn liveness stop spoofing. Works offline and syncs when back online.
GPS, QR, mobile face & web
- GPS / geofence — set each branch's location & radius under Branches; field staff check in only inside the allowed area.
- QR — open Attendance → QR on a screen; the code rotates every few seconds so a photo can't be reused.
- Mobile face — remote staff verify with a selfie matched to their enrolled face (blocks buddy-punching).
- Web — one-click check-in / out from the browser for remote and hybrid employees.
6. Employees
The Machine ID is the numeric PIN from the device — it links punches to the person and enrolls them on machines.
Add an employee
- Open People → Employees and click + Add Employee.
- Enter the Machine ID (numeric device PIN), first/last name, designation, department, home branch and shift.
- Tick the allowed branches (which branch devices they may punch on) and set the device role (User or Admin).
- Add salary (basic + allowances), joining date, WPS bank details and any documents. Save — the employee is queued to sync to the branch devices.
Edit, search & bulk actions
- Click an employee's name (or Edit) to open their full profile — one screen for personal details, assignment, salary and documents.
- Use the search box and the branch/department chips to find people fast.
- Tick several rows to bulk-assign a department, shift, branch, device role or active status.
- Export the whole roster (with document numbers & expiry dates) to Excel or CSV.
7. Documents & document vault
Upload documents
- Open an employee → Documents & Files panel.
- For each document (Passport, Emirates ID, Visa, Labour Card, Medical, Contract) set the issue/expiry dates and number, then Upload the scan (image or PDF).
- Use View to open a file or Download to save it. Files are private to your company.
Document Vault
- Open People → Documents for a company-wide vault.
- Each employee card shows all their documents with colour-coded expiry badges (expired / expiring ≤90 days / OK / missing).
- Search by name/code and filter by status to quickly find expiring or missing documents. View or download any file in one click.
8. Timetables, shifts & schedules
Working hours are built in three layers: a Timetable (a work period) → a Shift (one or more timetables) → a Schedule (a shift assigned to people over dates).
Create a timetable
- Open Scheduling → Timetables → + New Timetable.
- Set name, type, start/end time, grace minutes and break. If the break is fixed, set Break in/out and the minutes calculate automatically; otherwise just type the break minutes.
- Optionally set the Overtime in/out window. Save.
Types: Fixed = same hours daily; Flexible = counts total hours, no late penalty on start; Night = ends next day (cross-midnight, attributed to the start date); Split = a long mid-day gap; 24h = round-the-clock coverage.
Create a shift
- Open Scheduling → Shifts → + New Shift.
- Pick one timetable applied every day, or tick different timetable per weekday for a roster. Save.
Assign a schedule
- Open Scheduling → Schedules → + Assign Schedule.
- Filter people by branch, department or area, tick employees (or Select all shown), choose the shift and start date, then Assign.
- The roster calendar shows daily coverage; the "Employees per shift" panel lists who is on each shift. Attendance recomputes automatically.
9. Attendance rules
Rules decide how punches become statuses (Present / Late / Early Out / Half Day / Missing Punch) and hours. They apply as the default when an employee has no assigned shift for the day.
- Open Attendance → Rules.
- Set default start/end time, grace period (lateness allowed), break deducted, and the half-day and full-day hour thresholds.
- Choose how a single punch day is marked (Missing Punch / Half Day / Present).
- Under Payroll rules, toggle Pay overtime and Apply late-in deduction — turn these off if your business doesn't pay OT or doesn't deduct for lateness. Payroll and payslips update accordingly.
- Tick Recalculate all existing attendance to apply changes to history, then Save rules.
10. Attendance & approvals
- Open Attendance → Attendance to review processed days. Filter by date, employee, department or branch; each day shows check-in/out, worked hours, late/early minutes, OT and status.
- Employees with a self-service login use the /me portal to see their own attendance and submit requests (manual log, leave, overtime).
- Managers review requests in Attendance → Approvals. Approving a manual-log injects the punch and recomputes the day.
11. Payroll, payslips & WPS
Payroll is computed from processed attendance for the month — no separate data entry.
- Open Reports → Payroll, pick the month and optional department, then Apply.
- Each row shows basic, allowances, present/absent days, OT hours & pay, late minutes & penalty, deductions and net pay — honouring your Rules toggles.
- Export the whole run to Excel / PDF / CSV, or click Slip on a row for a printable payslip (with your company logo & letterhead).
- For UAE Wage Protection System, click WPS SIF to download the bank upload file (set your MOL/Establishment ID and routing code in Tenant Profile first).
12. Team, roles & scope
- Open Admin → Team & Users → Add Team Member. Enter name, email, password and role (HR, Branch/Dept Manager, Payroll, Auditor, Company Admin).
- Menu access — tick exactly which menus a user can see (leave blank for full access). This is enforced on the server, not just hidden.
- Data scope — tick specific branches and/or departments to restrict a user so they only ever see that data across employees, attendance, schedules, payroll and reports. Leave unticked for full access.
- Use the per-user Password, Menus and Scope buttons to change these later. Company Admins always have full access.
- Give an employee a self-service login from the same page so they can use the /me portal.
13. Billing & subscription
- Every workspace starts with a 7-day free trial. Open Admin → Billing to see your status and days left.
- Choose a plan and pay securely via Ziina. Billing is annual — one payment covers 12 months and extends your subscription a full year.
- If a trial or paid period lapses, the console shows a paywall until you renew. Your data is kept safe and returns as soon as you pay.
- Upgrade any time — plans differ only by branch, employee and device limits; every plan has every module.
14. Support & help
Need a hand? Email help@momentumtech.ae or message us on WhatsApp at +971 52 732 6003. We're based in Abu Dhabi, UAE. See the FAQ for quick answers.