كيفية استخدام M1 TimePilot
دليل كامل خطوة بخطوة لإعداد وتشغيل مساحة عملك — من أول فرع حتى رواتب الشهر.
١. البداية
Create your workspace, sign in and get oriented before adding data.
- Go to m1timepilot.com and click Get Started. Pick a plan (7-day free trial, no card), enter your company name, choose a subdomain (e.g. acme.m1timepilot.com), and create your admin login.
- Verify your email, then sign in at app.m1timepilot.com with your work email and password. The Company Code is optional — we find your company by email.
- You land on the Dashboard. The left sidebar is grouped: People, Scheduling, Attendance, Reports and Admin.
٢. ترتيب الإعداد الموصى به
For a smooth start, set things up in this order — each step builds on the one before it:
- Branches — your physical locations.
- Departments & areas — how you group staff and zones.
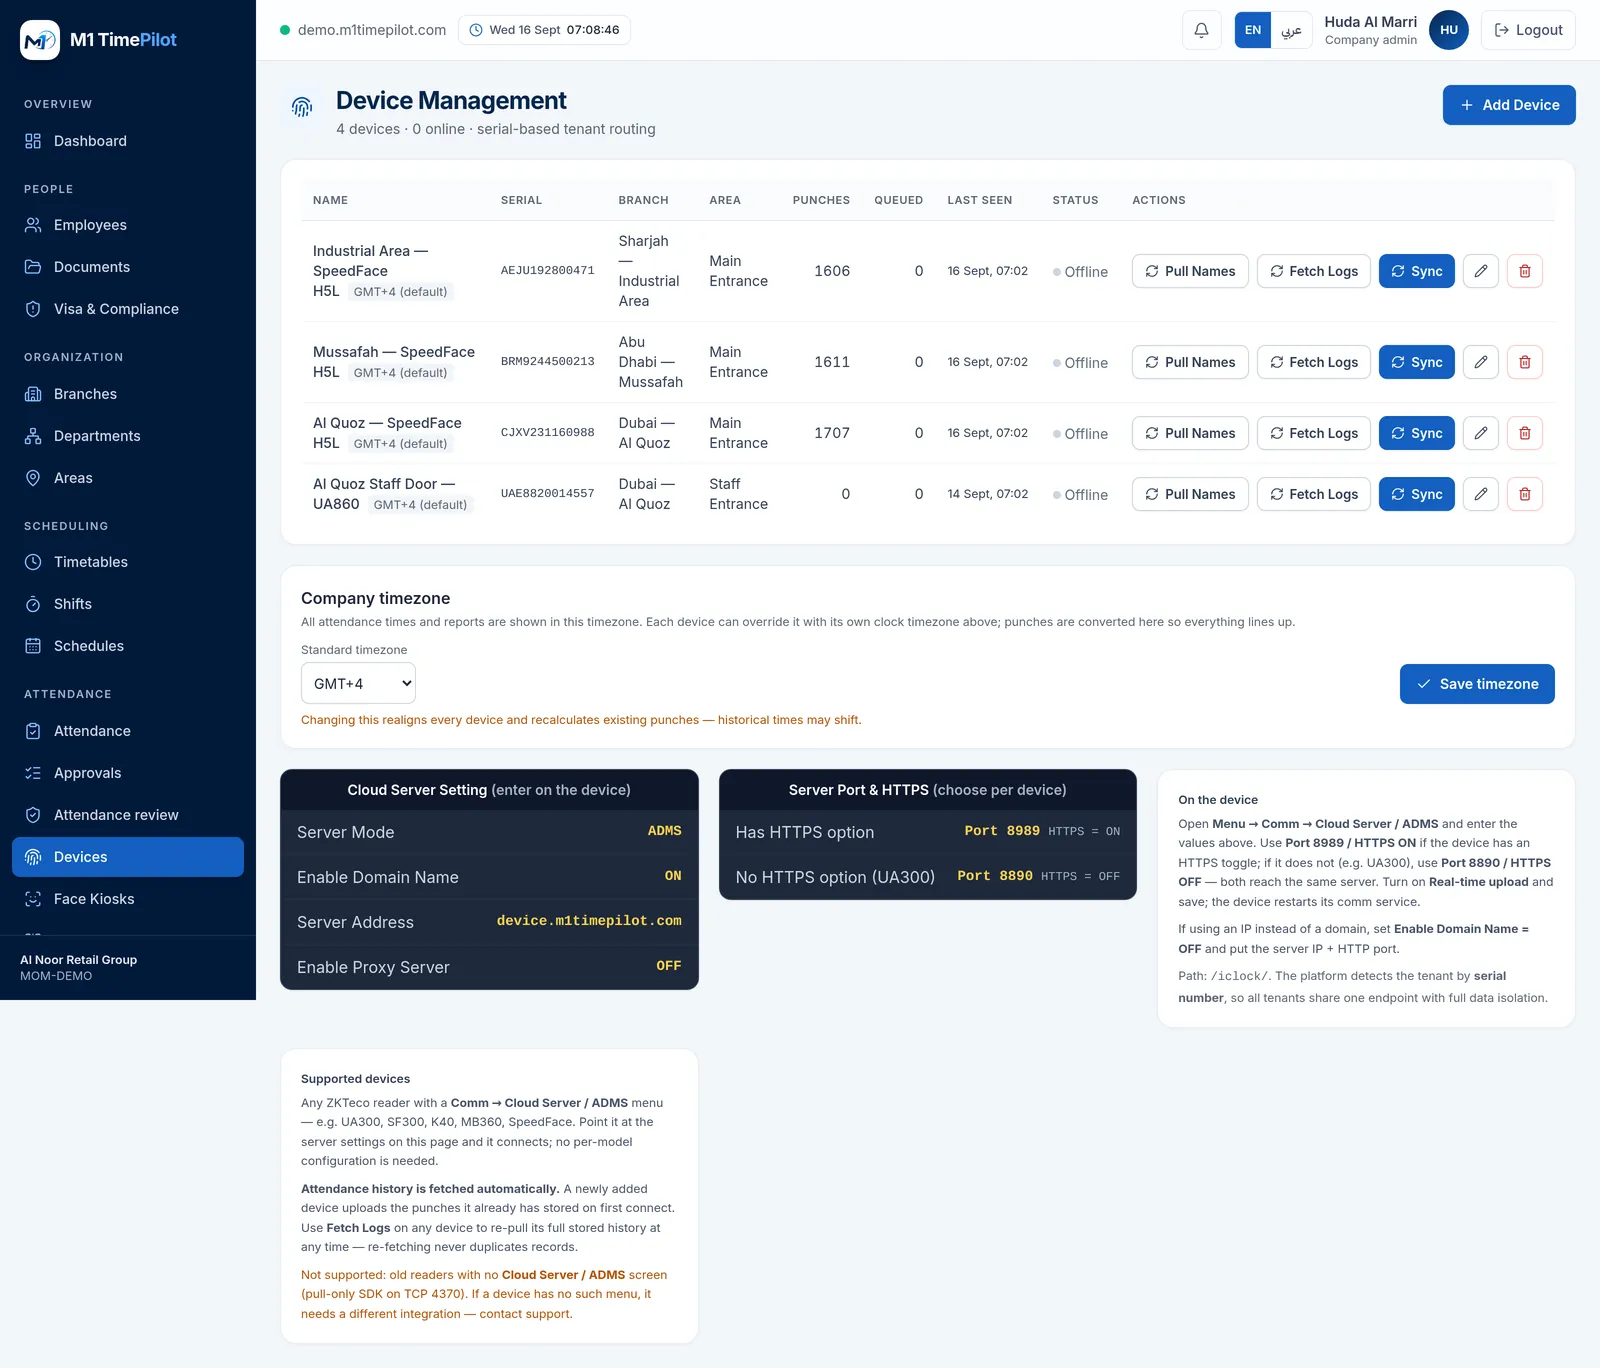
- Devices — register each biometric machine and point it to the cloud.
- Employees — add people (or let device punches auto-create them), then set their branch, department and salary.
- Timetables → Shifts → Schedules — define working hours and assign them.
- Attendance rules — grace, breaks, overtime and payroll switches.
- Run attendance & payroll — review, approve and export.
٣. الفروع
A branch is a physical location. Devices, employees and reports are organised by branch.
- Open People → Branches.
- Click Add Branch, enter a code (short, e.g. AUH), a name (e.g. Abu Dhabi Office) and optional address.
- Set the branch weekend days so weekends aren't counted as absences.
- Save. Repeat for each location. You can edit or remove a branch any time.
٤. الأقسام والمناطق
Departments
- Open People → Departments and click Add Department.
- Give it a code and name (e.g. DRV — Drivers). Save.
- You'll assign employees to a department on their profile — this drives department-wise reports and payroll grouping.
Areas
- Open People → Areas to group locations/zones within a branch (e.g. Warehouse, Reception).
- Areas are optional and help organise devices and staff on large sites.
٥. أجهزة البصمة
M1 TimePilot works with ZKTeco devices over ADMS/Cloud Push — no on-site server needed. Register the device in the app first, then point the machine to the cloud.
Register the device
- Open Attendance → Devices and click Add Device.
- Enter the device serial number (printed on the device / in its menu), a name, and the branch it belongs to. Save.
Point the device to the cloud
- On the ZKTeco unit go to Menu → Comm → Cloud Server / ADMS.
- Set Server Mode: ADMS, Domain Name: ON, Address: device.m1timepilot.com, Port: 8989 (HTTPS on) or 8890 (HTTPS off), HTTPS: ON, Real-time: ON.
- Save and let the device sync. Its status turns online in the Devices page and punches start flowing in.
٥ب. طرق تسجيل الحضور (كشك · GPS · QR · جوال · ويب)
إلى جانب أجهزة البصمة، يلتقط M1 TimePilot الحضور بأي طريقة يعمل بها فريقك. تُحدَّد الطرق المتاحة لكل عميل حسب إصدار باقته، مع إمكانية تجاوزات لكل عميل من المسؤول الأعلى.
كشك التعرف على الوجه
- سجّل وجه الموظف من صفحة ملفه (بطاقة تسجيل الوجه — يوافق الموظف مرة واحدة، وفق قانون حماية البيانات).
- أنشئ كشكًا من الحضور ← الأكشاك، ثم افتح رابط الإقران على أي جهاز لوحي أو هاتف عند المدخل.Attendance → Kiosks, then open its pairing link on any tablet at the entrance.
- يسجّل الموظفون الحضور بالنظر إلى الكاميرا؛ تمنع فحوصات الحيوية التزييف. يعمل دون اتصال ويتزامن عند عودة الاتصال.
GPS و QR والوجه عبر الجوال والويب
- GPS / السياج الجغرافي — حدّد موقع كل فرع ونطاقه من الفروع؛ يسجّل الموظفون الميدانيون داخل المنطقة المسموحة فقط.Branches; field staff check in only inside the allowed area.
- QR — افتح الحضور ← QR على شاشة؛ يعرض رمزًا يتجدد كل بضع ثوانٍ حتى لا يمكن إعادة استخدام صورة.Attendance → QR on a screen; the code rotates every few seconds so a photo can't be reused.
- الوجه عبر الجوال — يتحقق الموظفون عن بُعد بصورة ذاتية مطابقة لوجههم المُسجّل (يمنع التسجيل بالنيابة).
- الويب — تسجيل بنقرة واحدة من المتصفح للموظفين عن بُعد والهجين (اضبط وضع عمل الموظف على عن بُعد أو هجين).
٦. الموظفون
The Machine ID is the numeric PIN from the device — it links punches to the person and enrolls them on machines.
Add an employee
- Open People → Employees and click + Add Employee.
- Enter the Machine ID (numeric device PIN), first/last name, designation, department, home branch and shift.
- Tick the allowed branches (which branch devices they may punch on) and set the device role (User or Admin).
- Add salary (basic + allowances), joining date, WPS bank details and any documents. Save — the employee is queued to sync to the branch devices.
Edit, search & bulk actions
- Click an employee's name (or Edit) to open their full profile — one screen for personal details, assignment, salary and documents.
- Use the search box and the branch/department chips to find people fast.
- Tick several rows to bulk-assign a department, shift, branch, device role or active status.
- Export the whole roster (with document numbers & expiry dates) to Excel or CSV.
٧. المستندات والخزنة
Upload documents
- Open an employee → Documents & Files panel.
- For each document (Passport, Emirates ID, Visa, Labour Card, Medical, Contract) set the issue/expiry dates and number, then Upload the scan (image or PDF).
- Use View to open a file or Download to save it. Files are private to your company.
Document Vault
- Open People → Documents for a company-wide vault.
- Each employee card shows all their documents with colour-coded expiry badges (expired / expiring ≤90 days / OK / missing).
- Search by name/code and filter by status to quickly find expiring or missing documents. View or download any file in one click.
٨. الجداول والورديات والجداول الزمنية
Working hours are built in three layers: a Timetable (a work period) → a Shift (one or more timetables) → a Schedule (a shift assigned to people over dates).
Create a timetable
- Open Scheduling → Timetables → + New Timetable.
- Set name, type, start/end time, grace minutes and break. If the break is fixed, set Break in/out and the minutes calculate automatically; otherwise just type the break minutes.
- Optionally set the Overtime in/out window. Save.
Types: Fixed = same hours daily; Flexible = counts total hours, no late penalty on start; Night = ends next day (cross-midnight, attributed to the start date); Split = a long mid-day gap; 24h = round-the-clock coverage.
Create a shift
- Open Scheduling → Shifts → + New Shift.
- Pick one timetable applied every day, or tick different timetable per weekday for a roster. Save.
Assign a schedule
- Open Scheduling → Schedules → + Assign Schedule.
- Filter people by branch, department or area, tick employees (or Select all shown), choose the shift and start date, then Assign.
- The roster calendar shows daily coverage; the "Employees per shift" panel lists who is on each shift. Attendance recomputes automatically.
٩. قواعد الحضور
Rules decide how punches become statuses (Present / Late / Early Out / Half Day / Missing Punch) and hours. They apply as the default when an employee has no assigned shift for the day.
- Open Attendance → Rules.
- Set default start/end time, grace period (lateness allowed), break deducted, and the half-day and full-day hour thresholds.
- Choose how a single punch day is marked (Missing Punch / Half Day / Present).
- Under Payroll rules, toggle Pay overtime and Apply late-in deduction — turn these off if your business doesn't pay OT or doesn't deduct for lateness. Payroll and payslips update accordingly.
- Tick Recalculate all existing attendance to apply changes to history, then Save rules.
١٠. الحضور والموافقات
- Open Attendance → Attendance to review processed days. Filter by date, employee, department or branch; each day shows check-in/out, worked hours, late/early minutes, OT and status.
- Employees with a self-service login use the /me portal to see their own attendance and submit requests (manual log, leave, overtime).
- Managers review requests in Attendance → Approvals. Approving a manual-log injects the punch and recomputes the day.
١١. الرواتب والقسائم و WPS
Payroll is computed from processed attendance for the month — no separate data entry.
- Open Reports → Payroll, pick the month and optional department, then Apply.
- Each row shows basic, allowances, present/absent days, OT hours & pay, late minutes & penalty, deductions and net pay — honouring your Rules toggles.
- Export the whole run to Excel / PDF / CSV, or click Slip on a row for a printable payslip (with your company logo & letterhead).
- For UAE Wage Protection System, click WPS SIF to download the bank upload file (set your MOL/Establishment ID and routing code in Tenant Profile first).
١٢. الفريق والأدوار والنطاق
- Open Admin → Team & Users → Add Team Member. Enter name, email, password and role (HR, Branch/Dept Manager, Payroll, Auditor, Company Admin).
- Menu access — tick exactly which menus a user can see (leave blank for full access). This is enforced on the server, not just hidden.
- Data scope — tick specific branches and/or departments to restrict a user so they only ever see that data across employees, attendance, schedules, payroll and reports. Leave unticked for full access.
- Use the per-user Password, Menus and Scope buttons to change these later. Company Admins always have full access.
- Give an employee a self-service login from the same page so they can use the /me portal.
١٣. الفوترة والاشتراك
- Every workspace starts with a 7-day free trial. Open Admin → Billing to see your status and days left.
- Choose a plan and pay securely via Ziina. Billing is annual — one payment covers 12 months and extends your subscription a full year.
- If a trial or paid period lapses, the console shows a paywall until you renew. Your data is kept safe and returns as soon as you pay.
- Upgrade any time — plans differ only by branch, employee and device limits; every plan has every module.
١٤. الدعم والمساعدة
Need a hand? Email help@momentumtech.ae or message us on WhatsApp at +971 52 732 6003. We're based in Abu Dhabi, UAE. See the FAQ for quick answers.